Saturday 25 May 2013

Confession #19 - The Secret Strum! (Shhh!)


Have you ever looked at a TAB like the one below, and wondered, how does the guitar player make that chord change while still getting all the 16th notes to sound?

(Click to Enlarge)

The answer in many cases is that they are not getting all the 16th notes to sound.  It's more likely that they are really playing something like this:
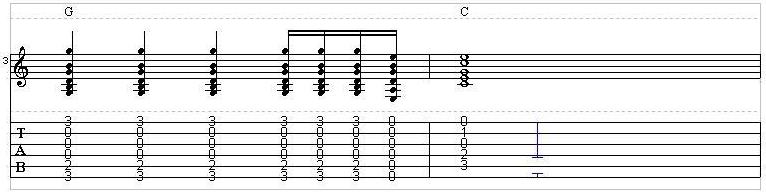
(Click to Enlarge)

The strum of the open strings on the last 16th note is called the secret strum.  Hitting the C chord on beat 1 of the second measure cleanly is very important, so the guitar player uses the secret strum to buy some time to make the chord change.

It's important that you don't overthink this!  Just focus on strumming the series of four 16th notes, and making a clean chord change to the C.  The secret strum will happen naturally.

The other thing to note here is that if you only hit strings 2, 3 and 4 on the secret strum, you'll be playing the notes B, G and D which are the notes in a G chord!  You're not strumming all  six strings  so the chord voicing will be different, but it will still be a G chord.

Don't worry if your strumming isn't that accurate.  Even if you catch some other strings, the duration is so short that it won't sound bad.  In fact the slight variation in sound is actually interesting to our ears.

The best example of this is 'Gloria' by Them.  Gloria uses a 1 bar chord progression and strumming pattern.  The secret strum is used on the 'and of beat 3' and the 'and of beat 4'.  This is what gives the song its pulsing feel.


Next Week's Confession - Palm Muting! (Part 1)


Monday 20 May 2013

In Memory of - Ray Manzarek


I was saddened today to hear of the death of Ray Manzarek of the Doors.  The Doors' music was a big part of my youth.  Something about it spoke to my teenage / 20-something angst.  I had all 6 studio albums, Absolutely Live, Alive She Cried, and even An American Prayer.  When I got my first guitar, the Doors 'Guitar Tab Anthology' was the first TAB book that I bought.  Sadly, its news like this that reminds me that I haven't listened to any of my Doors' albums in a long time.  Guess I'll have to dust them off, put them on, turn them up and remember Ray, loudly. :-)

Saturday 18 May 2013

Confession #18 - Slash Chords!


By now, you've probably come across some sheet music that calls for chords with cryptic names like C/G or D/F#.  And you've probably wondered to yourself, what the heck does that mean?  Today we'll find out.

SLASH CHORDS

These cryptically named chords are called slash chords.  To understand what they mean, we need to revisit some chord theory (see Confession #14 - Know What Chords to Play! for a detailed explanation of chord construction).

C/G

Let's start with a C chord.  As we learned in Confession #14 - Know What Chords to Play!, the notes that make up a C chord are C - E - G.

If we play a standard open position C chord on our guitar, the notes played are C - E - G - C - E (in order from the fifth string to the first string).  Notice that the note with the lowest pitch (i.e. the C at the 3rd fret of the fifth string) is also the root note from which the chord gets it name.

When you encounter a slash chord such as C/G, it means to play a C chord (i.e. a chord with the notes C - E - G), but instead of using the root note as the lowest pitched note in the chord, use a G as the lowest pitched note in the chord.

Here an example of a C/G slash chord in open position:


You'll here a C/G chord in the first verse of Heart's 'Crazy On You'.


D/F#

Let's take a D chord as another example.  The notes that make up a D chord are D - F# - A.


If we play a standard open position D chord on our guitar, the notes played are D - A - D - F# (in order from the fourth string to the first string).  Notice that the note with the lowest pitch (i.e. the D at the 0th fret of the fourth string) is also the root note from which the chord gets it name.

When you encounter a slash chord such as D/F#, it means to play a D chord (i.e. a chord with the notes D - F# - A), but instead of using the root note as the lowest pitched note in the chord, use an F# as the lowest pitched note in the chord.

Here an example of a D/F# slash chord in open position:


Use your thumb to fret the sixth string and to mute the fifth string.

Here's another way of fingering the same chord:


Use your first finger to mute the fifth string.  Don't worry if the open first string sounds.  I'm not sure of the exact naming convention, but it will turn this chord into a ninth chord and will still sound cool.

You'll here a D/F# chord in the first verse of Tom Petty's 'Yer So Bad'.


Chord Voicing

One of the reasons that people use slash chords is to give their chords a different voicing than the standard chords that we all learned from our beginner guitar books.  Using different voicing can bring a fresh and interesting sound to chord progressions.  Experiment with using slash chords in your chord progressions.


Next Week's Confession - The Secret Strum! (Shhh!)


Saturday 11 May 2013

Confession #17 - Spice up Your Rhythms!


In Confession #10 - Learn the Folk Rhythm! we learned, well... the folk rhythm. :-)

What makes the folk rhythm interesting to our ears is the way that the strum on the 'and of 2' is held for a quarter note's duration.  This emphasizes a beat that is normally not accented (i.e. the 'and of 2') and de-emphasizes a beat that is normally accented (i.e. beat 3, which is not played).


EMPHASIZE THE 'AND OF 4'

A variation of this is to strum on the 'and of 4' (e.g. counting eight notes in 4/4 time: 1 & 2 & 3 & 4 & ) and hold it for a quarter note's duration.  Beat 1 of the next measure is de-emphasized because you don't strum on that beat.

Here is a 2 bar strumming pattern that demonstrates this technique:

(Click to Enlarge)


CHANGE CHORDS EARLY

What makes this variation even more interesting is if we change chords early.  Typically we change chords at the beginning of a measure.  But combining a chord change on the 'and of 4' and sustaining it into the next measure is very interesting to our ears.

Here is a 2 bar strumming pattern that demonstrates this technique:

(Click to Enlarge)


ADD SOME 16TH NOTES

Finally, throwing in just a couple of 16th notes into a strumming pattern can really spice it up.

Here is a 2 bar strumming pattern that demonstrates this technique:

(Click to Enlarge)


The pair of 16th notes at the end will take some practice.  Start off slowly and gradually increase the tempo (see Confession #5 - Use a Metronome! ).

To play this successfully  you need to think about your strumming strategy.  I've included Down and Up markers in the TAB.  Until you get to the pair of 16th notes, you are using an eight note down-up approach (i.e. strumming down on the beat and strumming up on the 'and' of the beat).  When you get to beat 4 you are going to break this pattern and strum down on beat 4, down on the 'and of 4' (i.e. the first of the two 16th notes), and up on the second 16th note.  This will be a bit confusing to your strumming hand at first.

See Confession #10 - Learn the 'Folk' Rhythm! for another example of using 16th notes in a strumming pattern.


PUTTING IT ALL TOGETHER

Now let's apply all 3 of these techniques over a I-vi-IV-V7 chord progression in the key of G (see  Confession #14 - Know What Chords to Play!  to understand what the Roman numerals mean).

Thus, the chords are G-Em-C-D7.  This is the same progression that we used in Confession #5 - Use a Metronome! , and Confession #7 - Use Pivot Chords!.


(Click to Enlarge)

Finish this progression by switching back to the G chord and strumming it once.  I don't show this in the TAB above, but that's how the progression ends in the video below.


Have fun with these techniques and try to incorporate them in your playing!


Next Week's Confession - Slash Chords!

Saturday 4 May 2013

Confession #16 - Finger 3-4 Independence! (Exercise #1)


To play lead guitar effectively, you need to have co-ordination and dexterity in your fretting hand.  For fingers 1 to 3 of your fretting hand (finger 1 is your index finger), this is something that can be achieved just through your regular practice and playing.

However, when it comes to finger 4 (your pinky finger), developing co-ordination and dexterity is a greater challenge   It is not a strong finger, and tends to want to do whatever finger 3 is doing.  Thus, your practice routine should include some exercises to help develop your finger 3-4 independence.

FINGER 3-4 INDEPENDENCE - EXERCISE #1

Here is an exercise you can use to start that process.  Start with your fretting hand in 5th position (i.e. finger 1 is ready to fret notes at the 5th fret).  Change to the 7th, 8th and 10th position in measures 2, 3 and 4, respectively,  as shown in the TAB.  I have also indicated the fingering for the fretted notes.

Take it slowly at first, and gradually build up speed.  Play as slow as you need to so that you are playing it correctly.

Finger 3-4 Independence - Exercise #1
(Click to Enlarge)


Note that there are no sharps or flats, so this piece is in the key of C, but it doesn't have that happy major feel to it.  Instead is has a bit of a dark feel to it.  This is because it is in the Phrygian Mode.  The repeated open E string makes us hear the other notes  from the C major scale differently.  I'll talk about modes in a future confession, if I ever get around to understanding them myself. :-)


Next Week's Confession - Spice Up Your Rhythms! (Part 1)