Saturday 29 June 2013

Confession #24 - Voice Leading!


In Confession #18 - Slash Chords! we learned the meaning of chord names such as C/G, or D/F#, and learned how slash chords can bring a fresh and interesting sound to chord progressions because they use different chord voicing.

Another application for slash chords is called voice leading.

C-G-Am-G  Chord Progression

Let's take a look at a I-V-vi-V chord progression in the key of C (see Confession #14 - Know What Chords to Play! if you aren't sure what a I-V-vi-V progression is).  Thus, the chords in this progression are: C - G - Am - G.

If we play these chords using standard open chords,  the lowest sounding notes (i.e. the notes with the lowest pitch) will be the root notes of each chord.  Our ear actually distinguishes these low notes from the other notes being played and hears them like a bassline.

The notes of this bassline are: C - G - A - G (i.e. the root notes of each chord).  The movement of this bassline is:
  • start on C, 
  • down 5 semi-tones,
  • up 2 semi-tones, and 
  • down 2 semi-tones.

C-G/B-Am-G  Chord Progression

Now let's take this same progression and change the voicing of the first G chord by using a G/B slash chord.  Thus, the chords in this progression are: C - G/B - Am - G.

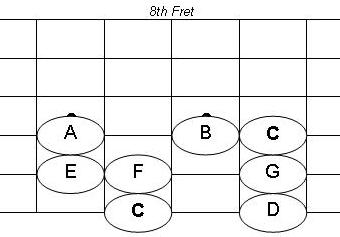
As we learned in Confession #11 - Learn Root 6 Barre Chords! the notes of a G chord are G, B and D. Here's what a G/B chord looks like:

G/B - Notes shown in order from fifth string to second string
(Click to enlarge)

Putting the B in the "bottom of the chord" (i.e. the lowest pitched note in the chord) in the first G chord   changes the bassline.

Now the notes of the baseline are C - B - A - G (i.e. not all root notes of the chords).  The movement of this bassline is:
  • start on C,
  • down 1 semi-tone,
  • down 2 semitones, and
  • down 2 more semi-tones.

As demonstrated in the following example, our ears can hear the difference in the movement suggested by the two different basslines.  The second progression has a different feel than the first because the bass notes descend with each chord change.


You've probably heard songs with a steadily descending movement with each chord change.  This is how that effect is achieved.

Voice Leading

Choosing a chord tone other than the root note as the lowest note in a chord can be used to change the feel and movement of the bassline in a chord progression.  This is called voice leading.

Try experimenting with this technique in your songs.  To use it effectively, you'll need to know the chord tones of each chord in your progression and then look for different ways to voice the chords so that you can get the bass note you want in the "bottom of the chord".


Next Week's Confession - Fret Hand Muting!


Saturday 22 June 2013

Confession #23 - Sing What You Play!


One of my goals when I started getting serious about the guitar was to learn to sing and play.  I've learned to do that, but my singing needs a lot of work.  Of course, time is tight and I never really get any dedicated singing practice time, so progress has been glacial.

Recently I've started teaching one of my children to play guitar.  When I was practicing just for my own benefit, there was never any need to say aloud the names of the notes I was playing.  However when teaching somebody else to play, its only natural to say the names of the notes that you want them to play.  And if you're going to say them, its only natural to sing them too.  If you just call them out in a monotone voice, it sounds awful against the melody coming from the guitar.

Its only been a few short weeks, but I'm already seeing a little bit of improvement.  I'm getting better at hitting my pitches, and I think my range is expanding ever so slightly.

Take a few minutes in your practice session to sing the names of the notes you are playing.  While you are playing your warm-up exercises would be a good time for this.

There are three benefits that you will realize from singing what you play:
  • naming the notes will improve your knowledge of the fretboard,
  • singing the notes will help develop your ear, and
  • singing the notes will help develop your singing voice.
You could use any of the one octave major scale patterns from Confession #8 - Learn the Major Scale!  or Confession #21 - Back to the Major Scale!.  These patterns have roots on the third, fifth and sixth strings, and can be shifted up and down the neck to play the major scale in a variety of different keys.

TIP:  Use your electronic tuner to verify what pitch you are singing.  If you're off by a semi-tone, it will sound awful and you'll know you're not hitting your pitch.  But you could be singing a third or a fifth above the target pitch, so it will sound nice and you'll think everything's cool.  The tuner will let you know if you are actually hitting your pitch, or just adding some harmony to it.


Next Week's Confession - Voice Leading!


Saturday 15 June 2013

Confession #22 - Finger 3-4 Independence! (Exercise #2)


In Confession #16 - Finger 3-4 Independence! (Exercise #1)  we learned a one string exercise that introduced our ear to the phrygian mode and challenged our 3rd and 4th fingers to work independently.

This week we'll learn a new finger 3-4 independence exercise.

FINGER 3-4 INDEPENDENCE - EXERCISE #2

This exercise is great because it challenges our fretting hand in 3 different ways:
  • It changes strings,
  • It stresses independence for all of your fingers, and
  • It moves "backwards".  I think most players are more comfortable moving from finger 1 to 2, 3 and 4 then they are moving from finger 4 to 3, 2 and 1, which this exercise requires you to do.

Finger 3-4 Independence - Exercise #2
(Click to Enlarge)


As always, take it slowly at first.  Don't expect to nail this exercise in one sitting.  It took me 5 minutes of daily practice for several days to get this to the point where I could play it comfortably at the tempo shown in the second half of the video.  I often use this as one of my warm-up exercises.


Next Week's Confession - Sing What You Play!

Wednesday 12 June 2013

Special! - Buck Dharma (Blue Öyster Cult)


Buck Dharma (real name Donald Roeser) is one of the guitar players for, and one of the original members of Blue Öyster Cult.

His personal web page includes a guitar section where you'll find tabs and lessons for some BÖC songs as wells as some of his old Guitar Secrets columns from Guitar magazine.

'Then Came the Last Days of May' is one of my personal favourties, and you'll find it here:

http://www.buckdharma.com/Guitar/Guits.shtml


Saturday 8 June 2013

Confession #21 - Back to the Major Scale!


In Confession #8 Learn the Major Scale we learned a one octave scale pattern for the major scale, with the root note on the third string.

TWO OCTAVE MAJOR SCALE PATTERN

Today we'll learn a two octave major scale pattern with its root note on the sixth string.  The TAB starts on the C at the 8th fret of the sixth string, so this is the C major scale.

(Click to Enlarge)


This pattern can be slid up and down the sixth string to play the major scale in different keys.  If you were to play this pattern starting on the A at the 5th fret of your sixth string, you would be playing the A major scale.

The first and second measure both start and end on a C.  Thus, this can be viewed as two separate one octave patterns, with one pattern starting on the sixth string, and the other pattern starting on the 4th string.


ISOLATE THE LOWER OCTAVE PATTERN

Let's put the first one octave pattern starting on the sixth string in box format.  The root note C, is in bold.

One octave major scale pattern
Root note on sixth string

The neat thing about this one octave pattern in the first measure is that it can be played  starting from a root note on the fifth string, and it will still give us a one octave major scale.

One octave major scale pattern
Root note on fifth string

FRETBOARD REVELATIONS

Let's compare the one octave pattern in the first measure of the TAB above to the one octave pattern we learned in Confession #8 Learn the Major Scale.

One octave major scale pattern
Root note on sixth string

One octave major scale pattern
Root note on third string

These two patterns actually look very similar.  The layout of the notes on the:
  • the sixth string is the same as on the third string,
  • the fifth string is the same as on the second string, and
  • the fourth string is the same as on the first string.

The only difference is that when moving up one whole step to switch from the note D to the note E:
  • in the first pattern, we have to back 3 frets,
  • in the second pattern, we have to go back only 2 frets.

This observation provides some insight into standard tuning:

  • On any of strings 6, 5 ,4 or 2, if you move up one string and back 3 frets (i.e. switch from finger 4 to finger 1), that's a whole step.  
  • On string 3, if you move up one string and back 2 frets, that's a whole step. 

The way I like to remember these rules is that:
  • when moving from finger 4 on one string to finger 1 on the next higher string, that's a whole step, and
  • when moving from string 3 to string 2, the whole step is one fret closer than it is on the other strings.

Remembering these rules will allow you to build a major scale anywhere on the fretboard.  Apply the major scale formula from Confession #8 Learn the Major Scale and then use these rules when switching strings.


Last week's confession, Confession #20 - Palm Muting! (Part 1), has been updated to include a video.


Next Week's Confession - Finger 3-4 Independence! (Ex. #2)


Saturday 1 June 2013

Confession #20 - Palm Muting! (Part 1)


Palm muting is a right-hand technique (i.e. your strumming hand) that allows you to dampen the strings a bit so that they don't ring on so much, and it also provides a chunkier sound.

PALM MUTING

As its name suggests, to palm mute, you use the palm of your right hand to mute or dampen the guitar's strings.  You're not actually using your whole palm to do this.  Really its just the edge of your palm below your pinky finger.

Rest the edge of your palm across all six strings at the bridge of your guitar.  The closer to the bridge your hand is, the less damping your palm will provide.  The further from the bridge your hand is, the more damping your palm will provide and the chunkier it will sound.  Apply some overdrive for full effect!

Try applying palm muting to this simple Chuck Berry rhythm.  In the TAB, palm muting is applied in the second measure only.  Try experimenting with and without applying palm muting.  Also try moving your palm closer to and further from the bridge.

Click to Enlarge


CREATING RHYTHM PATTERNS

Using palm muting allows us to expand our ability to create interesting rhythm patterns.  Instead of palm muting for an entire measure, experiment with palm muting some but not all of the beats within a measure.

Here is a example of a common application of this technique:

Click to Enlarge

This palm muting pattern produces a sound like this:

                                        Ba - Da - Da - Ba - Da - Da - Ba -Da


You'll hear a variation of this common pattern in Bryan Adam's 'Summer of 69'.


You'll also hear this rhythm pattern at the very beginning of Chuck Berry's 'Johhny B. Goode', where Chuck is using slides (not palm muting) to get the 'Ba - Da - Da' effect.


Next Week's Confession - Back to the Major Scale!