Showing posts with label barre chord. Show all posts

Saturday, 27 April 2013

Confession #15 - Find the I, IV, V in any Key!


As we learned last week in Confession #14 - Know What Chords to Play!, the I, IV and V chords in any major key are all major chords.  Major chords have a happy feel to them and thus are very popular chords in all kinds of music.  This makes the major chords very important chords to know.

In this week's confession, we'll learn how to quickly find the I, IV and V chord in any key by using Root 6 and Root 5 barre chords (see Confession #11 - Learn Root 6 Barre Chords! and Confession #12 - Learn Root 5 Barre Chords!).


STARTING ON A ROOT 6 BARRE CHORD

Let's say that you are playing a root 6 barre chord at the 5th fret of your sixth string, like this:


You would be playing a A chord (because the note at the 5th fret of the sixth string is an A).


If you treat the A chord as the I chord (i.e. the song is in the Key of A), then your IV chord will be the root 5 barre chord at the 5th fret of your fifth string, like this:


You would be playing a D chord (because the note at the 5th fret of the fifth string is an D).


And finally, the V chord will be the root 5 barre chord at the 7th fret of your fifth string, like this:


You would be playing an E chord (because the note at the 7th fret of the fifth string is an E)

Thus, in the Key of A, the I, IV and V chords are A, D and E.


You can use this pattern anywhere on the neck:
  • Play a Root 6 barre chord as your I chord.  
  • Play a Root 5 barre chord at the same fret, and that's your IV chord.  
  • Play a Root 5 barre chord two frets higher, and that's your V chord.

If we focus just on the root notes of the chords, then you can think of it like this:
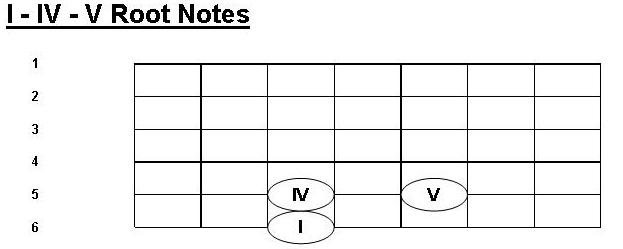


Note that I haven't given any fret numbers.  That's because this works anywhere on the neck. Pick any note on the sixth string as the root of your I chord.  The roots of the IV and V chord will be on the fifth string where shown above.


STARTING ON A ROOT 5 BARRE CHORD

Let's say that you are playing a root 5 barre chord at the 5th fret of your fifth string, like this:


You would be playing a D chord (because the note at the 5th fret of the fifth string is an D).


If you treat the D chord as the I chord (i.e. the song is in the Key of D), then your IV chord will be the root 6 barre chord at the 3rd fret of your sixth string, like this:


You would be playing a G chord (because the note at the 3rd fret of the sixth string is an G).


And finally, the V chord will be the root 6 barre chord at the 5th fret of your sixth string, like this:


You would be playing an A chord (because the note at the 5th fret of the sixth string is an A).

Thus, in the Key of D, the I, IV and V chords are D, G and A.


You can use this pattern anywhere on the neck:
  • Play a Root 5 barre chord as your I chord.  
  • Play a Root 6 barre chord two frets lower, and that's your IV chord.  
  • Play a Root 6 barre chord two frets higher, and that's your V chord.

If we focus just on the root notes of the chords, then you can think of it like this:


Note that I haven't given any fret numbers.  That's because this works anywhere on the neck. Pick any note on the fifth string as the root of your I chord.  The roots of the IV and V chord will be on the sixth string where shown above.


Next Week's Confession - Finger 3-4 Independence! (Exercise #1)


Saturday, 13 April 2013

Confession #13 - Learn More Barre Chords!

In Confession #11 - Learn Root 6 Barre Chords and in Confession # 12 - Learn Root 5 Barre Chords we learned how to take the open E chord shape and the open A chord shape and use them to create a bunch more chords by sliding the shape up and down the neck of the guitar and barring finger 1 across all the strings.

In this week's confession, we'll learn how to create major, dominant 7th, minor and minor 7th barre chords.

With these extra chords, you'll have the ability to play the majority of the principal chords in any given key!

With this ability and a bit of knowledge from next week's confession, you'll have the ability to start creating your own chord progressions and write your own songs!

TRIVIA - The rhythm guitar part for The Cure's "Boys Don't Cry" consists entirely of root 5 barre chords, both major and minor.  Great songs can be written with just basic chords!


WARNING!  Barre chords can be very hard on your fretting hand.  Make sure that you warm-up first (see Confession #6 - Warm-Up!).  If you start to feel any pain or discomfort in your fretting had, stop immediately!  If you keep on playing, you can do serious damage to your fretting hand.


ROOT 6 / E SHAPE BARRE  CHORD VARIATIONS

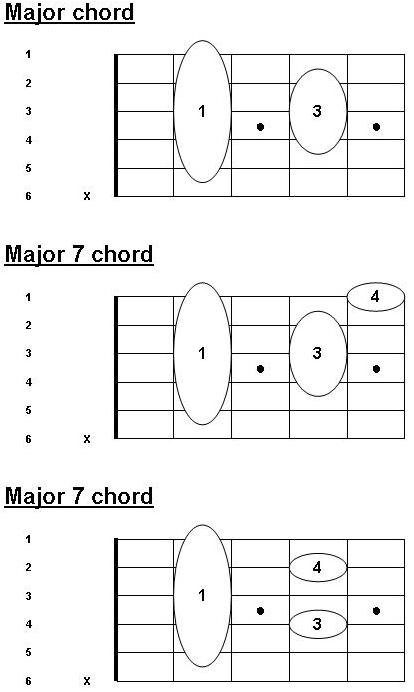
First we'll start with some E shape major chords.

Remember from Confession #11 - Learn Root 6 Barre Chords!  that the name of the chord comes from the fretted note on the sixth string.  In the examples that follow, that's an F, so these are all variations on an F chord.


EDIT - The last 2 charts are labelled incorrectly, and should say Dominant 7th chord.  I will fix them later.

Note the two different ways of playing the dominant 7th chord.  While technically the same chord, each has a  slightly different feel, so try both and see which fits best in your song.


Next we'll do some E shape minor chords:


ROOT 5 / A SHAPE BARRE  CHORD VARIATIONS

First we'll start with some A shape major chords.

Remember from Confession #12 - Learn Root 5 Barre Chords!  that the name of the chord comes from the fretted note on the fifth string.  In the examples that follow, that's a B, so these are all variations on a B chord.


EDIT - The last 2 charts are labelled incorrectly, and should say Dominant 7th chord.  I will fix them later.

Next we'll do some A shape minor chords:


Spend some time practicing these chords to prepare for next week's confession.  Focus on the major and the minor chords, and if you have time the 7th chords.


Next Week's Confession - Know What Chords to Play!

Saturday, 6 April 2013

Confession #12 - Learn Root 5 Barre Chords!


In Confession #11 - Learn Root 6 Barre Chords! we learned how to play a bunch of different major chords by sliding an E shape chord up the neck, and using our first finger as a barre.  There is another very commonly used barre chord called a Root 5 barre chord, or an A shape barre chord.

WARNING!  Barre chords can be very hard on your fretting hand.  Make sure that you warm-up first (see Confession #6 - Warm-Up!).  If you start to feel any pain or discomfort in your fretting had, stop immediately!  If you keep on playing, you can do serious damage to your fretting hand.


FIRST, THE A CHORD

Let's take a look at a basic open A chord.  Generally, you will use fingers 1,2 and 3 to play the A chord, like this:


But what if you used only finger 3, like this:


Then finger 1 (your index finger) would be free to do other things.

Let's use the 3 only fingering, and then slide it up two frets like this:


As in the the lesson on Root 6 barre chords, if you strum strings 1 thru 5 now, its not going to sound very musical (remember, when playing an A chord, we don't strum the sixth string, so don't do it when you are playing A shape barre chords).  When we slid finger 3 up two frets, we changed the pitch of 3 of the 5 strings by 2 semi-tones (see Confession #8 - Learn the Major Scale! if you are unsure of what a semi-tone is), but the pitch of the other 2 strings was unchanged.

EDIT:  In each of the 3 diagrams above, the second string should not have an "O" beside it. (It's a pain to redo the diagrams.)


TURN AN A CHORD INTO A B CHORD

How do we change the pitch of the other 2 strings by 2 semi-tones as well?  We do this by barring finger 1 across all the strings at the 2nd fret, like this:


Now the pitch of strings 1 and 5 have also been changed by 1 semi-tone.  The resulting chord is an B chord.

By barring finger 1 across all the strings at the 2nd fret, we are using our finger as a moveable nut (the 0th fret is the guitar's nut).

Don't worry if the barre with your third finger prevents the first string from sounding.  As you'll see in the chart below for the C chord, all 3 notes of the chord are included in the notes played on strings two thru five.

TIP:  It takes a fair bit of pressure with finger 1 to properly fret strings 1, 2 and 6.  If you aren't using enough pressure, they either won't sound properly or at all.  Make sure you are barring just behind the fret.  Also, tuck you elbow in at your side.  This will provide some leverage to create the needed pressure.


NOW A C CHORD

We can take this shape and slide it up and down the neck to make different chords.  For example, if you barre the 3rd fret while holding the same shape with finger 3, you'll be making a C chord, like this:


How do you know that this is a C chord?  Here is the C chord chart again, but this time with the names of the notes, instead of the fingerings:


This is a C chord because the note at the 3rd fret of the fifth string is a C.  That's the note that gives the chord its name.


ROOT 5 BARRE CHORD / A SHAPE BARRE CHORD

Because the name of the chord comes from the fifth string, a barre chord based on the shape of an open A chord is called a "root 5 barre chord".  The note on the fifth string is the root note of the chord.

Because it is based on the shape of open A chord, it is also sometimes referred to as an "A shape barre chord".

PUTTING BARRE CHORDS TO WORK

Now that you know how to play a root 5 barre chord, you can play a whole bunch of different chords, just by moving this shape up and down the neck.

This week's video includes an example that is based entirely on root 5 barre chords.  The example is a simple chord progression based on the I, IV and V chords in the key of A (being A, D and E major chords). Note the use of the 'folk rhythm' (see Confession #10 - Learn the Folk Rhythm!) over the IV chord (i.e. the D chord played at the 5th fret).


MORE LEARNING THE FRETBOARD

As you are experimenting with the root 5 barre chord, you will be learning the names of the notes on your fifth string.

Note in the chart for the C chord above, that the note at the 5th fret of the third string was also a G.

So, once you learn where a note is on the 5th string, you now also know where to find that same note on the 3rd string, like this:


As you are learning your root 5 barre chords, you are also learning the names of the notes on the fifth string  and the names of the notes on the 3rd string.


MORE COOL ROCK SOUND

Take another look at the C chord above.  The notes on the bottom 3 strings are C - E - C,  the second C being one octave higher than the first.  From a theory perspective, these notes are the root, the fifth and the octave in the key of C (I'll explain the theory in a future confession).  If you play just these bottom 3 strings, you get that cool rock sound.

Turn up your amp, turn on the overdrive channel, strum the bottom 3 strings, and let them ring!


Next Week's Confession - Learn More Barre Chords!


Saturday, 30 March 2013

Confession #11 - Learn Root 6 Barre Chords!


Barre chords are very popular chords for a few reasons:
  • One, they are pretty easy to play,
  • Two, they allow you to play a bunch of chords using only one chord shape, and
  • Three, the bottom strings of the chord make a cool rock sound.
So what is a barre chord?

WARNING!  Barre chords can be very hard on your fretting hand.  Make sure that you warm-up first (see Confession #6 - Warm-Up!).  If you start to feel any pain or discomfort in your fretting had, stop immediately!  If you keep on playing, you can do serious damage to your fretting hand.


FIRST, THE E CHORD

Let's take a look at a basic open E chord.  Generally, you will use fingers 1, 2 and 3 to play the open E chord, like this:


But what if you used fingers 2,3 and 4, like this:


Then finger 1 (your index finger) would be free to do other things.  No, I don't mean making rude gestures at the drummer.

Let's use the 2, 3, 4 fingering, and then slide each finger up one fret like this:


If you strum all of the strings now, its not going to sound very musical.  Why is that?

When we slid fingers 2, 3 and 4 up one fret, we changed the pitch of 3 of the 6 strings by 1 semi-tone (see Confession #8 - Learn the Major Scale! if you are unsure of what a semi-tone is), but the pitch of the other 3 strings was unchanged.


TURN AN E CHORD INTO AN F CHORD

How do we change the pitch of the other 3 strings by 1 semi-tone as well?  We do this by barring finger 1 across all the strings at the first fret, like this:


Now the pitch of strings 1, 2 and 6 have also been changed by 1 semi-tone.  The resulting chord is an F chord.

By barring finger 1 across all the strings at the first fret, we are using our finger as a moveable nut (the 0th fret is the guitar's nut).

TIP:  It takes a fair bit of pressure with finger 1 to properly fret strings 1, 2 and 6.  If you aren't using enough pressure, they either won't sound properly or at all.  Make sure you are barring just behind the fret.  Also, tuck you elbow in at your side.  This will provide some leverage to create the needed pressure.


NOW A G CHORD

We can take this shape that our 4 fingers are making and slide it up and down the neck to make different chords.  For example, if your barre the 3rd fret while holding the same shape with fingers 2, 3 and 4, you'll be making a G chord, like this:


How do you know that this is a G chord?  Here is the G chord chart again, but this time with the names of the notes, instead of the fingerings:


This is a G chord because the note at the 3rd fret of the sixth string is a G.  That's the note that gives the chord its name.


ROOT 6 BARRE CHORD / E SHAPE BARRE CHORD

Because the name of the chord comes from the name of the note on the sixth string, a barre chord based on the shape of an open E chord is called a "root 6 barre chord".  The note on the 6th string is the root note of the chord.

Because it is based on the shape of an open E chord, it is also sometimes referred to as an "E shape barre chord".


PUTTING BARRE CHORDS TO WORK

Now that you know how to play a root 6 barre chord, you can play a whole bunch of different chords, just by moving this shape up and down the neck.

This week's video includes 2 examples that are based entirely on root 6 barre chords.  The first example is a simple chord progression based on the I, IV and V chords in the key of E (being E, A and B major chords). Note the use of the 'folk rhythm' (see Confession #10 - Learn the Folk Rhythm!) over the IV chord (i.e. the A chord played at the 5th fret).

The second example is something I came up with that uses E major and E7 shape barre chords.  Lift finger 4 (your pinky) and you'll be playing a 7 chord.  In case you are wondering, I am changing keys in this progression. Don't ask me which ones.  I came up with this by ear and thought that it sounded cool.


BONUS - LEARNING THE FRETBOARD

As you are experimenting with the root 6 barre chord, you will be learning the names of the notes on your sixth string.

Note in the chart for the G chord above, that the note at the 5th fret of the fourth string was also a G.

So, once you learn where a note is on the 6th string, you now also know where to find that same note on the 4th string, like this:


As you are learning your root 6 bare chords, you are also learning the names of the noes on the sixth string  and the names of the notes on the fourth string.


BONUS - COOL ROCK SOUND

Take another look at the G chord above.  The notes on the bottom 3 strings are G - D - G,  the second G being one octave higher than the first.  From a theory perspective, these notes are the root, the fifth and the octave in the key of G (I'll explain the theory in a future confession).  If you play just these bottom 3 strings, you get that cool rock sound.

Turn up your amp, turn on the overdrive channel, strum the bottom 3 strings, and let them ring!


Next Week's Confession - Learn Root 5 Barre Chords!


Saturday, 23 February 2013

Confession #6 - Warm Up! - Exercise #1

When you are young, your body will let you get away with a lot.  I'm sorry to tell you that as you get older, it won't do that anymore.  If you are an older player, you need to warm up before playing.  If you are a younger player, it's a good habit to get into now, rather than trying to break 20 years worth of bad habits when you are older. And yes, even the pros warm-up before a gig.

Also remember to take a short break every 45 minutes or so and give your fretting a hand a rest.

FRETTING HAND

Playing guitar can be hard on your fretting hand, especially if you are playing songs with lots of barre chords. Barre chords require you to hold your hand in an awkward position  and then squeeze with a lot of force. That can be hard on your wrist.  So rather than starting by picking up your guitar and slamming out The Ramone's Blitzkrieg Bop, take a few minutes to warm up your hand first.

I'll talk more about barre chords in a future Confession.

First, Some Single Notes

I have a few different exercises that I use for warm-up.  They can be played anywhere on the fretboard, but I usually start them in 5th position (i.e. at the 5th fret).  This is because 5th position is probably the post comfortable position to play at on the whole guitar.  Your wrist is not cocked one way or the other, and the spacing between the frets is just right.

Warm Up! - Exercise #1 is a simple chromatic run.  It doesn't sound particularly musical, but that's not its purpose.  Play it slowly.  As your hand limbers up, you can gradually increase the tempo.  Remember, the point is to warm up, not to shred.  Also, use light pressure with your fretting hand.  Don't try to strangle the guitar's neck!  Using light pressure will also benefit you by forcing you to be more accurate about your finger positioning behind the fret.


Warm Up! - Exercise #1
(Click to Enlarge)

 I actually like to start by playing each note twice, like this:

Warm Up! - Exercise #1 playing each note twice
(Click to Enlarge)

This slows down the changes and gives your fingers a chance to get up to speed.  Then I do single notes.


The other benefit of Warm Up! - Exercise #1 is that the descending phrases (i.e. 8-7-6-5 etc.) help develop your finger 3-4 independence (finger 4 is your pinky).  I'll talk more about finger 3-4 independence in a future Confession.

Now Some Chords

When playing the single note warm up exercises, only one finger is under tension at a time.  After I've finished my single note exercises, I like to switch to some open chord work. This will put 2 or 3 fingers under tension simultaneously.  So pick your favourite strumming song and gently play through it.  Your fretting hand should be warmed up now.

Mix It Up

Warm up exercises get boring fast!  When they do, your mind starts to wander and then you start making mistakes.  So don't stay on any one exercise too long.  Mix it up!  I'll provide some more warm up exercises in future Confessions.

SHOULDERS

Dunno if its just me, but my shoulders sometimes get stiff when playing.  So I like to do some stretches beforehand.  Stand up straight with your arms at your side.  Keep your arms straight and raise them to the side until  they are pointing at the ceiling.  With both arms up over your head now, grab one hand with the other and gently stretch.  Release and slowly lower them back down at your side.

(If this causes you any pain or discomfort, stop immediately!)


Next Week's Confession - Use Pivot Chords!