Showing posts with label chord progression. Show all posts

Saturday, 3 August 2013

Confession #28 - Palm Muting (Part 2)


In Confession #20 - Palm Muting! (Part 1) we learned about palm muting and how it can be used to get a chunkier sound and to create rhythm patterns by selectively muting certain beats in a measure.

In this confession, we'll learn about another cool application for palm muting, percussive slaps.

Percussive Slaps 

If you strum a chord and mute the strings with your palm of your strumming hand at the same time, you get a percussive sound from the guitar that has very little tonal content.  The resulting sound is different from the percussive sound produced when using fret hand muting (see Confession #25 - Fret Hand Muting!).

This technique is very useful when you are strumming your acoustic and singing a song.  You can use palm muting on beats 2 and 4 to simulate the percussive accent that a snare drum provides when playing with a drummer.

It takes a little bit of practice to get this right.  Strum the chords normally, but when you get to beat 2 and 4 rotate your hand outward a bit so that your palm comes down on the strings near the bridge at the same time that you strum them.

Strumming a "1 and 2  3 and 4" pattern like the first part of the video below should come without too much difficulty.

The challenge comes when you switch to a "1 and 2 and 3 and 4" strumming pattern like the second part of the video.  Because you have to change your hand position to apply the palm muting on beats 2 and 4, its a bit tricky to get a proper upstroke on the "and of beat 2" immediately after applying the palm mute.  Like all things with the guitar, it will come with practice.

In the third part of the video, I play through the G-Em-C-D7 chord progression from Confession #5 - Use a Metronome!  and Confession #7 - Use Pivot Chords! using a "1 and 2 and 3 and 4 and" strumming pattern, and apply this technique.


(Sorry for the crappy video. WinXP patch KB 2834904 was released by Microsoft on July 10th and has spawned numerous complaints.  Among those complaints is the top half of videos being black, which is exactly what happens when I create the movie in Windows Movie Maker.  Once Microsoft fixes this problem I'll redo the movie.)


Next Week's Confession - Finger 3-4 Independence! (Ex. #3)


Saturday, 29 June 2013

Confession #24 - Voice Leading!


In Confession #18 - Slash Chords! we learned the meaning of chord names such as C/G, or D/F#, and learned how slash chords can bring a fresh and interesting sound to chord progressions because they use different chord voicing.

Another application for slash chords is called voice leading.

C-G-Am-G  Chord Progression

Let's take a look at a I-V-vi-V chord progression in the key of C (see Confession #14 - Know What Chords to Play! if you aren't sure what a I-V-vi-V progression is).  Thus, the chords in this progression are: C - G - Am - G.

If we play these chords using standard open chords,  the lowest sounding notes (i.e. the notes with the lowest pitch) will be the root notes of each chord.  Our ear actually distinguishes these low notes from the other notes being played and hears them like a bassline.

The notes of this bassline are: C - G - A - G (i.e. the root notes of each chord).  The movement of this bassline is:
  • start on C, 
  • down 5 semi-tones,
  • up 2 semi-tones, and 
  • down 2 semi-tones.

C-G/B-Am-G  Chord Progression

Now let's take this same progression and change the voicing of the first G chord by using a G/B slash chord.  Thus, the chords in this progression are: C - G/B - Am - G.

As we learned in Confession #11 - Learn Root 6 Barre Chords! the notes of a G chord are G, B and D. Here's what a G/B chord looks like:

G/B - Notes shown in order from fifth string to second string
(Click to enlarge)

Putting the B in the "bottom of the chord" (i.e. the lowest pitched note in the chord) in the first G chord   changes the bassline.

Now the notes of the baseline are C - B - A - G (i.e. not all root notes of the chords).  The movement of this bassline is:
  • start on C,
  • down 1 semi-tone,
  • down 2 semitones, and
  • down 2 more semi-tones.

As demonstrated in the following example, our ears can hear the difference in the movement suggested by the two different basslines.  The second progression has a different feel than the first because the bass notes descend with each chord change.


You've probably heard songs with a steadily descending movement with each chord change.  This is how that effect is achieved.

Voice Leading

Choosing a chord tone other than the root note as the lowest note in a chord can be used to change the feel and movement of the bassline in a chord progression.  This is called voice leading.

Try experimenting with this technique in your songs.  To use it effectively, you'll need to know the chord tones of each chord in your progression and then look for different ways to voice the chords so that you can get the bass note you want in the "bottom of the chord".


Next Week's Confession - Fret Hand Muting!


Saturday, 20 April 2013

Confession #14 - Know What Chords to Play!


By now, you've learned several chords, both open chords and barre chords, and have probably experimented with creating your own chord progressions.  One of the challenges with creating your own chord progressions is knowing what chords to play.  This is made a lot easier if you know what the possibilities are.

In this confession, we'll learn how to harmonize the major scale, which is a fancy way of saying we'll learn the basic chords that work with any particular major key.

The principal chords for a particular major key can be summarized by the following formula:

        I - ii - iii - IV - V - vi - viio

What does this cryptic formula mean?  How can it help me know what chords to play?  Will it make me more attractive to the opposite sex?  Read on to find out...

TIP:  Melody refers to a series of notes played one after the other.  You can whistle a melody.  Harmony refers to two or more notes played simultaneously, which is what you do when you play a chord on your guitar.

HOW CHORDS ARE MADE

Chords are built by taking a root note, and then adding two or more additional notes from whatever particular musical key you are working in (i.e. a chord consists of at least 3 notes).  For this confession, we'll work in the key of C, and use the piano keyboard to help us visualize the building of chords.

As we learned in Confession #8 - Learn the Major Scale!, the notes of the major scale in the key of C are:

C - D - E - F - G - A - B - C

These notes are arranged on the piano keyboard as follows:


To harmonize the C major scale, we start with a root note, and then add the note that is two notes away from the root, and the note that is two notes away from the second note (this distance is referred to as a diatonic third interval, but don't get bogged down with the theory).

Put another way, start with the root note, skip a note and take the next note, skip another note and take the next note.

HARMONIZING THE MAJOR SCALE

C MAJOR CHORD

Let's harmonize the C major scale by starting with the first note of that scale, C.

Starting on our root note C, and applying the skipping formula above, the notes of our chord will be C, E and G.

C - D - E - F - G - A - B - C


The notes C, E and G give us a C major chord.

Observe that the second note of the chord is 4 semi-tones higher than the root note.  Also observe that the third note of the chord is 3 semi-tones higher that the second note.  Because the distance between the root note and the second note of the chord is 4 semi-tones, the chord will be a major chord and have a happy feel to it.

The chord that is built on the first note of the major scale will always be a major chord, no matter what key you are playing in!

D MINOR CHORD

Let's move on to the second note in the C major scale, D.

Starting on our root note D, and applying the skipping formula above, the notes of our chord will be D, F and A.

C - D - E - F - G - A - B - C


The notes D, F and A give us a D minor chord.

Observe that the second note of the chord is 3 semi-tones higher than the root note.  Also observe that the third note of the chord is 4 semi-tones higher that the second note.  Because the distance between the root note and the second note of the chord is 3 semi-tones, the chord will be a minor chord and have a sad feel to it.

The chord that is built on the second note of the major scale will always be a minor chord, no matter what key you are playing in!

E MINOR CHORD

Let's move on to the third note in the C major scale, E.

Starting on our root note E, and applying the skipping formula above, the notes of our chord will be E, G and B.

C - D - - F - - A - B - C


The notes E, G and B give us an E minor chord.

Observe that the second note of the chord is 3 semi-tones higher than the root note.  Also observe that the third note of the chord is 4 semi-tones higher that the second note.  Because the distance between the root note and the second note of the chord is 3 semi-tones, the chord will be a minor chord and have a sad feel to it.

The chord that is built on the third note of the major scale will always be a minor chord, no matter what key you are playing in!

F MAJOR CHORD

Let's move on to the fourth note in the C major scale, F.

Starting on our root note F, and applying the skipping formula above, the notes of our chord will be F, A and C.

C - D - E - - G - - B - C


The notes F, A and C give us an F major chord.

Observe that the second note of the chord is 4 semi-tones higher than the root note.  Also observe that the third note of the chord is 3 semi-tones higher that the second note.  Because the distance between the root note and the second note of the chord is 4 semi-tones, the chord will be a major chord and have a happy feel to it.

The chord that is built on the fourth note of the major scale will always be a major chord, no matter what key you are playing in!

G MAJOR CHORD

Let's move on to the fifth note in the C major scale, G.

Starting on our root note G, and applying the skipping formula above, the notes of our chord will be G, B and D.

C - D - E - F - - A - - C - D


The notes G, B and D give us a G major chord.

Observe that the second note of the chord is 4 semi-tones higher than the root note.  Also observe that the third note of the chord is 3 semi-tones higher that the second note.  Because the distance between the root note and the second note of the chord is 4 semi-tones, the chord will be a major chord and have a happy feel to it.

The chord that is built on the fifth note of the major scale will always be a major chord, no matter what key you are playing in!

A MINOR CHORD

Let's move on to the sixth note in the C major scale, A.

Starting on our root note A, and applying the skipping formula above, the notes of our chord will be A, C and E.

C - D - E - F - G - - B - C - D - E


The notes A, C and E give us an A minor chord.

Observe that the second note of the chord is 3 semi-tones higher than the root note.  Also observe that the third note of the chord is 4 semi-tones higher that the second note.  Because the distance between the root note and the second note of the chord is 3 semi-tones, the chord will be a minor chord and have a sad feel to it.

The chord that is built on the sixth note of the major scale will always be a minor chord, no matter what key you are playing in!

B DIMINISHED CHORD

Let's move on to the seventh note in the C major scale, B.

Starting on our root note B, and applying the skipping formula above, the notes of our chord will be B, D and F.

C - D - E - F - G - A - - C - D - E - F


The notes B, D and F give us a B diminished chord.

Observe that the second note of the chord is 3 semi-tones higher than the root note.  Also observe that the third note of the chord is 3 semi-tones higher that the second note.  Two intervals of 3 semi-tones produce a diminished chord, which has a unique sound to it.  Diminished chords are not heard in popular music very often.

The chord that is built on the seventh note of the major scale will always be a diminished chord, no matter what key you are playing in!


BUT WHAT DOES IT ALL MEAN?

From the examples above, what we've learned about the major scale is that:
  • the chord built on the 1st note is a major chord,
  • the chord built on the 2nd note is a minor chord,
  • the chord built on the 3rd note is a minor chord,
  • the chord built on the 4th note is a major chord,
  • the chord built on the 5th note is a major chord,
  • the chord built on the 6th note is a minor chord, and
  • the chord built on the 7th note is a diminished chord,
You can use this summary chart to quickly figure out what chords to play in a particular key.

If you are playing in the key of C, the major chords in that key are C, F and G (the 1st, 4th and 5th notes of the C major scale).  The minor chords are D, E and A (the 2nd, 3rd and 6th notes of the C major scale).

If you are playing in the key of G, the major chords in that key are G, C and D (the 1st, 4th and 5th notes of the G major scale).  The minor chords are A, B and E (the 2nd, 3rd and 6th notes of the G major scale).

Note that the number that we assign to each note of any particular scale (i.e. 1st note, 2nd note, etc.) is called a scale degree.


CHORD NOTATION

Musicians often use scale degrees when referring to chords in a particular key.  You've probably heard the expression, "one, four, five rock".  This means that the song uses the one, four and five chords in whatever key it happens to be in.

When writing chords down on paper, we use roman numerals.

We only use uppercase roman numerals to refer to major chords. Thus, the one, four, five rocker mentioned above would be written down like this:

    I - IV - V

We use lowercase roman numerals to refer to minor chords.  So, if a song was based on a two, three, six progression, it would be written down like this:

    ii - iii - vi

The diminished chord has a minor quality to it (because, like a minor chord, there are 3 semi-tomes between the first note and the second note), so it is also written in lowercase, with a superscript o after it, which signifies the diminished chord.  Thus, the seven chord is written down like this:

    viio

When we put all the chords down in order, we get the formula at the beginning of this post:

    I - ii - iii - IV - V - vi - viio

The roman numeral tells us which scale degree of the major scale the chord is built on, and the case tells us the quality of the chord, uppercase for major, and lowercase for minor.


EXAMPLE

Back in Confession #5 - Use a Metronome!, I introduced the following chord progression:

            G-Em-C-D7

which I described as a I-vi-IV-V7 progression in the key of G.  After today's lesson, you now have an understanding of what a a I-vi-IV-V7 progression is.

Note that the V7 refers to the five chord, as signified by the uppercase V.  The 7 after the V tells us to add a note and turn it into a dominant seventh chord (see Confession #13 - Learn More Barre Chords!  for some dominant seventh chord fingerings).  I'll explain more about dominant seventh chords in a future confession.

MEMORIZE THE FORMULA

Once you've memorized the formula:

    I - ii - iii - IV - V - vi - viio

you can pick a key and know the basic chords that work in that key just by applying the formula to the notes of the major scale in that key (see Confession #8 - Learn the Major Scale! for a refresher on building the major scale in any key).

Of course these aren't the only chords within the key, but knowing the basic chords that work will allow you to create your own progressions and ultimately to write your own songs, which just might make you more attractive to the opposite sex.


Next Week's Confession - Find the I, IV, V in Any Key!


Saturday, 13 April 2013

Confession #13 - Learn More Barre Chords!

In Confession #11 - Learn Root 6 Barre Chords and in Confession # 12 - Learn Root 5 Barre Chords we learned how to take the open E chord shape and the open A chord shape and use them to create a bunch more chords by sliding the shape up and down the neck of the guitar and barring finger 1 across all the strings.

In this week's confession, we'll learn how to create major, dominant 7th, minor and minor 7th barre chords.

With these extra chords, you'll have the ability to play the majority of the principal chords in any given key!

With this ability and a bit of knowledge from next week's confession, you'll have the ability to start creating your own chord progressions and write your own songs!

TRIVIA - The rhythm guitar part for The Cure's "Boys Don't Cry" consists entirely of root 5 barre chords, both major and minor.  Great songs can be written with just basic chords!


WARNING!  Barre chords can be very hard on your fretting hand.  Make sure that you warm-up first (see Confession #6 - Warm-Up!).  If you start to feel any pain or discomfort in your fretting had, stop immediately!  If you keep on playing, you can do serious damage to your fretting hand.


ROOT 6 / E SHAPE BARRE  CHORD VARIATIONS

First we'll start with some E shape major chords.

Remember from Confession #11 - Learn Root 6 Barre Chords!  that the name of the chord comes from the fretted note on the sixth string.  In the examples that follow, that's an F, so these are all variations on an F chord.


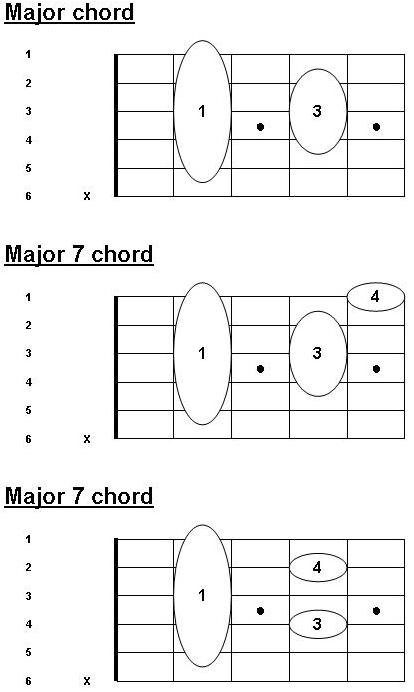
EDIT - The last 2 charts are labelled incorrectly, and should say Dominant 7th chord.  I will fix them later.

Note the two different ways of playing the dominant 7th chord.  While technically the same chord, each has a  slightly different feel, so try both and see which fits best in your song.


Next we'll do some E shape minor chords:


ROOT 5 / A SHAPE BARRE  CHORD VARIATIONS

First we'll start with some A shape major chords.

Remember from Confession #12 - Learn Root 5 Barre Chords!  that the name of the chord comes from the fretted note on the fifth string.  In the examples that follow, that's a B, so these are all variations on a B chord.


EDIT - The last 2 charts are labelled incorrectly, and should say Dominant 7th chord.  I will fix them later.

Next we'll do some A shape minor chords:


Spend some time practicing these chords to prepare for next week's confession.  Focus on the major and the minor chords, and if you have time the 7th chords.


Next Week's Confession - Know What Chords to Play!

Saturday, 16 February 2013

Confession #5 - Use a Metronome!

... or a Drum Machine, or a Multi-Effects Pedal,  or an Electronic Keyboard


One of the most important skills for any musician to develop is a sense of rhythm.  You may play brilliantly, but if you can’t play in time with a metronome or other musicians, then you'll be stuck in your basement forever.  To some people, this skill may come easy, while for others it will take some practice.  But it can be learned.

PLAYING ALONG WITH THE RECORD IS NOT THE SAME THING

Now, just because you are able to play along with the record doesn’t mean that you’ve mastered this skill.  When you play along with the record you have an example to follow and are subconsciously picking up on other cues in the recording.  None of these things will be present if it’s just you and a metronome, or you and a bass player and a drummer.

METRONOME vs. DRUM MACHINE vs. KEYBOARD

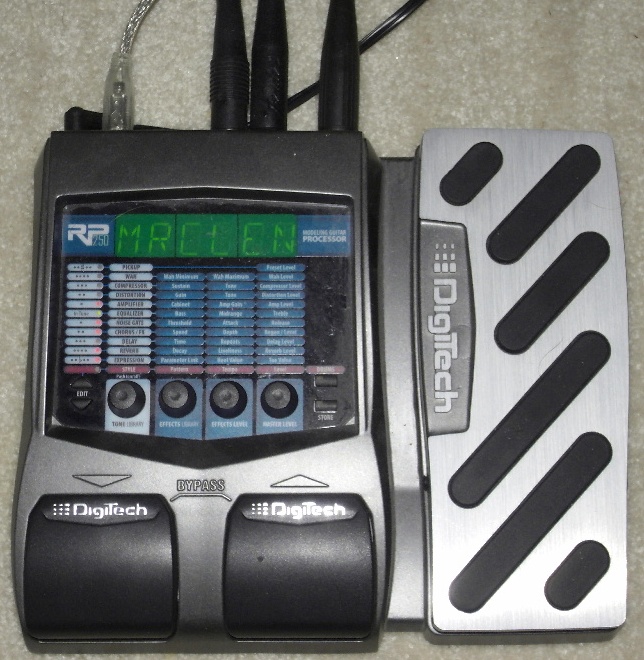
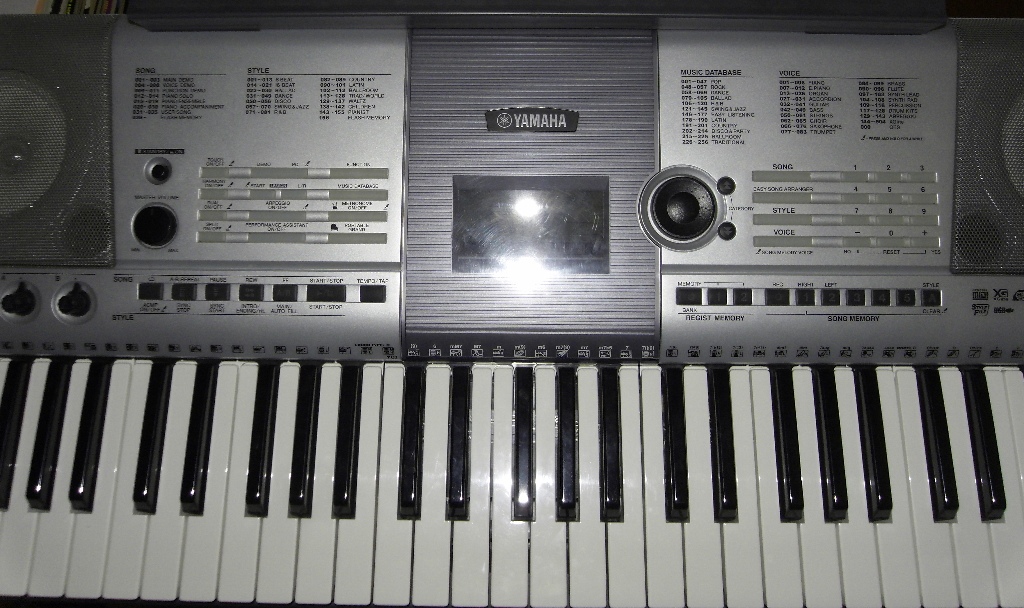
Metronomes are really, really boring musically, but are also pretty inexpensive.  Consider stepping up to a drum machine, or a multi-effects unit with a built in drum machine (I have the Digitech RP-250), or better yet an electronic keyboard (I have the Yamaha Portatone PSR-E403).  All will provide you with a variety of beats to practice with. 

Digitech RP-250 Multi-Effects Pedal

Yamaha Portatone PSR-E403

An electronic keyboard has some additional benefits:


  • If it has auto-accompaniment, you can use it for one chord jams in a variety of musical styles, and
  • The piano keyboard can be a useful tool for learning and understanding musical theory because it has  easily recognizable patterns.  Patterns are harder to see on the fretboard, so this can make it hard to grasp musical concepts and relationships.


Spot the C Major Scale on the Keyboard

Now find it on the Fretboard !?!?!?

USING A METRONOME

Hopefully I’ve convinced you that using a metronome has many benefits:

·        It's like truth serum for your playing.  If your rhythm is off, it will show.
·        It will help you develop a feel for a steady rhythm.  You'll play better when there isn’t a beat available.
·        It's great for rythym training exercises (e.g. learning to play 16th notes at 100 bpm)


The most important thing to remember when using a metronome is to:

            Know the part before playing with the metronome!

There's no point in putting a beat on until you know the part you are trying to play.  If you are constantly starring at the TAB and still working on fingerings, the beat will just drive you mad and hinder your progress. You don't have to have the part fully memorized, but your fingers should already know where they want to go as your eyes move quickly over the TAB.

The other most important thing to remember is to:

            Start Slowly!

If you set a tempo that is too fast, then you will make mistakes.  Worse, you will probably persist at that tempo (You’re probably telling yourself that “I should be able to do this!”) and keep making more mistakes.  What ends up happening is that you practice making mistakes instead of practicing playing correctly.  Don't practice making mistakes!

Start with a tempo that you can play comfortably at without any mistakes.  Stick at this tempo and develop a feel for the part you are practicing and develop your muscle memory for playing it correctly.  Slowly speed up the tempo, even if it’s only 4 bpm at a time.  If you speed up the tempo and find yourself making mistakes, go back to the original tempo and practice playing it correctly.  

Remember, you are not going to get a new part up to tempo in one evening.  It may take several days of slowly increasing the tempo to get up to speed.

Don't practice the same thing for more than 5 or 10 minutes per session.  If you practice one part for 30 minutes,  it is more likely to hinder than help your progress.  Keep the practice short and give your brain a chance to digest.

KEEP IT SIMPLE

While you are developing a feel for rhythm, you need to keep it simple and slowly increase the difficulty.  Start with just whole notes and strum a chord on every beat 1.  If this is going well, then try strumming on beat 1 and beat 3 (i.e. half notes).  Next step up to quarter notes (i.e. beat 1, 2, 3 and 4), etc.

Alternatively,  stick with whole notes, but change chords every time beat 1 comes around.  Try  the following I-vi-IV-V7 progression in the key of G:

            G-Em-C-D7


I’ll talk more about this progression in a future Confession.


FINISH ON A HIGH NOTE

The last thing you hear is what’s going to stick in your brain.  This is why it is critical that you finish your practice session by playing the new part you’re learning correctly.  It’s great to increase the tempo during your practice session and push yourself, but always finish your session by slowing it down to a comfortable tempo and playing the part correctly.  This is what your brain will remember.


Get your gear today with the AMS Easy Payment Plan


Next Week's Confession - Warm Up! - Exercise #1