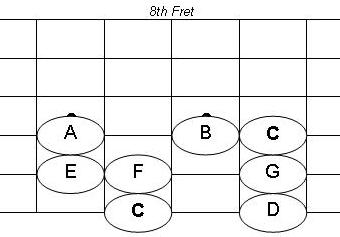
Here is major pentatonic pattern #2 in the key of C. I've coloured the root notesred for easy reference. I've also shown pattern #1 in the diagram so you can see how the two patterns are connected. The dashed notes on the left belong only to pattern #1. The notes in the middle are common to both patterns. The notes on the right belong only to pattern #2.
Minor Pentatonic Pattern #2
Here is minor pentatonic pattern #2 in the key of A minor. Again, I've coloured the root notesred for easy reference and I've also shown pattern #1 in the diagram so you can see how the two patterns are connected.
I've also coloured two notes in blue. I find that these two notes from the extended box are very powerful when played together. You'll see/hear this in the TAB/video below.
I was trying to figure out why they are so powerful and here's what I came up with. The E is the 5th in the key of A or Am. We already know how powerful the 5th is from playing root-5 power chords.
The G is the flat 7th in the key of A or Am. As discussed in last week's confession, the G is what turns an Am chord into an Am7 chord. It's also what turns a an A chord into an A7 chord.
Combined, the 5th and the flat 7th imply a minor 7th chord or a dominant 7th chord. I suspect that is why they sound so good together.
Here is a little riff that moves between the extended box from pattern #2 and pattern #1. In the last measure, execute a grace note slide into the E at the 9th fret of the third string and hold it while you play the G at the 8th fret of the second string.
Next Week's Confession - Pentatonic Scales (Part 3)
In Confession #18 - Slash Chords! we learned the meaning of chord names such as C/G, or D/F#, and learned how slash chords can bring a fresh and interesting sound to chord progressions because they use different chord voicing.
Another application for slash chords is called voice leading.
C-G-Am-G Chord Progression
Let's take a look at a I-V-vi-V chord progression in the key of C (see Confession #14 - Know What Chords to Play! if you aren't sure what a I-V-vi-V progression is). Thus, the chords in this progression are: C - G - Am - G.
If we play these chords using standard open chords, the lowest sounding notes (i.e. the notes with the lowest pitch) will be the root notes of each chord. Our ear actually distinguishes these low notes from the other notes being played and hears them like a bassline.
The notes of this bassline are: C - G - A - G (i.e. the root notes of each chord). The movement of this bassline is:
start on C,
down 5 semi-tones,
up 2 semi-tones, and
down 2 semi-tones.
C-G/B-Am-G Chord Progression
Now let's take this same progression and change the voicing of the first G chord by using a G/B slash chord. Thus, the chords in this progression are: C - G/B - Am - G.
G/B - Notes shown in order from fifth string to second string
(Click to enlarge)
Putting the B in the "bottom of the chord" (i.e. the lowest pitched note in the chord) in the first G chord changes the bassline.
Now the notes of the baseline are C - B - A - G (i.e. not all root notes of the chords). The movement of this bassline is:
start on C,
down 1 semi-tone,
down 2 semitones, and
down 2 more semi-tones.
As demonstrated in the following example, our ears can hear the difference in the movement suggested by the two different basslines. The second progression has a different feel than the first because the bass notes descend with each chord change.
You've probably heard songs with a steadily descending movement with each chord change. This is how that effect is achieved.
Voice Leading
Choosing a chord tone other than the root note as the lowest note in a chord can be used to change the feel and movement of the bassline in a chord progression. This is called voice leading.
Try experimenting with this technique in your songs. To use it effectively, you'll need to know the chord tones of each chord in your progression and then look for different ways to voice the chords so that you can get the bass note you want in the "bottom of the chord".
Today we'll learn a two octave major scale pattern with its root note on the sixth string. The TAB starts on the C at the 8th fret of the sixth string, so this is the C major scale.
(Click to Enlarge)
This pattern can be slid up and down the sixth string to play the major scale in different keys. If you were to play this pattern starting on the A at the 5th fret of your sixth string, you would be playing the A major scale.
The first and second measure both start and end on a C. Thus, this can be viewed as two separate one octave patterns, with one pattern starting on the sixth string, and the other pattern starting on the 4th string.
ISOLATE THE LOWER OCTAVE PATTERN
Let's put the first one octave pattern starting on the sixth string in box format. The root note C, is in bold.
One octave major scale pattern
Root note on sixth string
The neat thing about this one octave pattern in the first measure is that it can be played starting from a root note on the fifth string, and it will still give us a one octave major scale.
One octave major scale pattern
Root note on fifth string
FRETBOARD REVELATIONS
Let's compare the one octave pattern in the first measure of the TAB above to the one octave pattern we learned in Confession #8 Learn the Major Scale.
One octave major scale pattern
Root note on sixth string
One octave major scale pattern
Root note on third string
These two patterns actually look very similar. The layout of the notes on the:
the sixth string is the same as on the third string,
the fifth string is the same as on the second string, and
the fourth string is the same as on the first string.
The only difference is that when moving up one whole step to switch from the note D to the note E:
in the first pattern, we have to back 3 frets,
in the second pattern, we have to go back only 2 frets.
This observation provides some insight into standard tuning:
On any of strings 6, 5 ,4 or 2, if you move up one string and back 3 frets (i.e. switch from finger 4 to finger 1), that's a whole step.
On string 3, if you move up one string and back 2 frets, that's a whole step.
The way I like to remember these rules is that:
when moving from finger 4 on one string to finger 1 on the next higher string, that's a whole step, and
when moving from string 3 to string 2, the whole step is one fret closer than it is on the other strings.
Remembering these rules will allow you to build a major scale anywhere on the fretboard. Apply the major scale formula from Confession #8 Learn the Major Scale and then use these rules when switching strings.
The major scale pattern is the single most important bit of music theory you will ever learn. It is the foundation upon which everything else is built. So it is critical for your development as a musician that you learn this pattern.
If you've seen The Sound of Music, or even if you haven't, then you are familiar with the sound of:
do-re-mi-fa-so-la-ti-do
This is the sound of the major scale pattern.
TIME FOR SOME THEORY
In Confession #5 - Use a Metronome!, I talked about how the piano is an excellent tool for learning music theory, and showed a picture of the C major scale on the piano keyboard:
The first C is the root note of the scale (the one on the left). The second C is called the octave (the one on the right). If the frequency of the first C is 200Hz (Hz or Hertz means cycles per second), then the frequency of the second C is 400Hz, exactly twice is fast (see Confession #3 - Set-up your Guitar! for more on the octave). So when you play the octave of any particular note, the frequency of the sound vibration is twice as fast.
The octave of any particular root note has a fundamental sameness as the root note. This is why it is given the same name. It's pitch may be higher, but it has the same quality as its root note. Thus, we will only find unique notes between a root note and its octave.
For reasons that are unknown to me, it was decided long ago that the octave should be divided up into 12 notes (well... actually, there are reasons in physics for this). Start at the first C and count all the keys up to and including the B. You'll find 12 notes.
For further reasons that are also unknown to me, it was decided long ago that we would ignore 5 of these 12 notes, leaving 7 notes to form the major scale. I don't think physics is to blame for this.
Notice that some of the notes of the scale have a black key between them, and others do not. This pattern of white and black keys makes up the major scale pattern, which in the key of C is:
C-D-E-F-G-A-B-C
Whole Steps and Half Steps
Since we want to be able to play in all musical keys and not just the key of C, we need a way to describe the major scale pattern that will allow us to find it in other keys. We do this by describing that major scale as a series of whole steps and half steps like this:
W-W-H-W-W-W-H
...where W means a whole step and H means a half-step.
On the Piano
On the piano, a W means move up two keys (regardless of colour) and H means move up one key (regardless of colour). If you start on the first C on the keyboard above, and apply this pattern, you will hit all the white keys and finish on the octave, like this:
C-W-D-W-E-H-F-W-G -W-A -W-B -H-C
On the Guitar
On the guitar W means move up two frets and H means move up one fret. So, on the guitar fretboard, the pattern looks like this:
If we tuned our 6th string to a C, then starting with the open string (i.e. the root), this pattern would give us the C major scale. Of course, our 6th string is actually tuned to an E, so playing this pattern actually gives us the E major scale: E - F# - G# - A - B - C# - D# - E.
Tip: Applying scale patterns to open strings helps us visualize the pattern better then staying in one position and changing strings as we move up the sale. Use this technique when learning new scales.
Now in practice, we rarely play a entire scale on just one string (but it can be quite effective - The Cure's "Just Like Heaven" uses a descending scale pattern on the 2nd string for one of its lead lines), so we need to learn a major scale pattern that allows us to stay in one position.
Warm Up Exercise #2 - Major Scale in One Position
Here is a one octave major scale pattern that starts on the third string and finishes on the first string. The numbers 1 to 4 indicate which finger should be used for each note in the scale (where 1 is your index finger and 4 is your pinky). If you play this pattern in 5th position (i.e. starting at the 5th fret), then you'll get the C major scale.
I like to use this pattern as part of my warm-up exercises. I play it ascending and descending like this:
Warm-Up! - Exercise #2 - C Major Scale (Click to Enlarge)
As mentioned in Confession #6 - Warm-up!, warm-up exercises get boring in a hurry, so move this pattern up and down the neck to keep things interesting. For example, if you start the pattern in 7th position, then you'll be playing the D major scale. Try to get to the point where you can play the scale ascending and descending in 5th position, and then seamlessly switch to playing it in 7th position without stopping.
+-+MAJOR.JPG)
+-+MINOR.JPG)
+-+TAB.JPG)