Showing posts with label key of A. Show all posts

Saturday, 2 November 2013

Confession #41 - 12 Bar Blues!


Participate for a chance to win a trip to see your favourite band in concert! by Keurig


Last week we learned pentatonic pattern #1 (see Confession #40 - Pentatonic Scales (Part 1)).  This week we'll put that pattern to use over a 12 bar blues chord progression.


12 BAR BLUES

The 12 bar blues is a standard chord progression used frequently in, yes you guessed it, blues music.  It is also frequently used in rock and roll.  As you may have already guessed, the progression is 12 bars long.  At the end of the 12 bars, the progression is repeated again and again throughout the song.

Basic 12 Bar Blues

At its most basic, the progression consists of the I, IV and V chords of whatever key you happen to be playing in, organized like this:

|  I   |  I   |  I   |  I   |
|  IV  |  IV  |  I   |  I   |
|  V   |  IV  |  I   |  V   |

See Confession #14 - Know What Chords to Play!  if you aren't sure what the roman numerals mean.


In the key of A, the I, IV and V chords are A, D and E, so the progression would be:

|  A   |  A   |  A   |  A   |
|  D   |  D   |  A   |  A   |
|  E   |  D   |  A   |  E   |


Dominant Sevenths

It is also very common for the 12 bar blues to be played using all dominant 7th chords like this:

|  I7  |  I7  |  I7  |  I7  |
|  IV7 |  IV7 |  I7  |  I7  |
|  V7  |  IV7 |  I7  |  V7  |


See Confession #13 - Learn More Barre Chords! for examples of some dominant 7th chord fingerings.

As we'll learn in a future confession about harmonizing the major scale in sevenths, technically you change key every time you change chords when you play a 12 bar blues this way.

Quick Change

Another common variation is to play the IV chord or the IV7 chord in the second measure, like this:

|  I7  |  IV7 |  I7  |  I7  |
|  IV7 |  IV7 |  I7  |  I7  |
|  V7  |  IV7 |  I7  |  V7  |

This is referred to as the "quick change".  You'll hear the quick change in the Blue Brothers version of Sweet Home Chicago.


MOVEABLE RIFF

The first two measures of the TAB below introduce a riff that is played in 5th position and is based (mostly) on the A minor pentatonic scale.

The riff also includes the "flat-five" or the "blue note" (6th fret of your fifth string) which is not technically part of the scale, but is often used with it.  I'll talk more about the blue note in a future confession.

When the chord changes to a D in the 5th measure, the riff follows the chord.  The riff is identical except that it now it starts on a D instead of an A.

This could be done by staying on the fourth and fifth strings and moving up to 10th position, but its easier to shift to the third and fourth strings.  When a riff follows the chords like this, it is called a moveable riff.


VIDEO AND TAB

Here's a video demonstration of a 12 bar blues in the key of A using the moveable riff in the TAB below:


Here's the TAB for the song.  In the third and fourth measures I have shown the suggested fingerings for playing the riff.  I have also shown suggested fingering in the twelfth measure.  This is what works for me.  If it doesn't work for you then try a different fingering.


12 Bar Blues in the Key of A
(Click to Enlarge)

Have fun playing this one!


Next Week's Confession - 7th Chord Cheat Sheet!


Saturday, 8 June 2013

Confession #21 - Back to the Major Scale!


In Confession #8 Learn the Major Scale we learned a one octave scale pattern for the major scale, with the root note on the third string.

TWO OCTAVE MAJOR SCALE PATTERN

Today we'll learn a two octave major scale pattern with its root note on the sixth string.  The TAB starts on the C at the 8th fret of the sixth string, so this is the C major scale.

(Click to Enlarge)


This pattern can be slid up and down the sixth string to play the major scale in different keys.  If you were to play this pattern starting on the A at the 5th fret of your sixth string, you would be playing the A major scale.

The first and second measure both start and end on a C.  Thus, this can be viewed as two separate one octave patterns, with one pattern starting on the sixth string, and the other pattern starting on the 4th string.


ISOLATE THE LOWER OCTAVE PATTERN

Let's put the first one octave pattern starting on the sixth string in box format.  The root note C, is in bold.

One octave major scale pattern
Root note on sixth string

The neat thing about this one octave pattern in the first measure is that it can be played  starting from a root note on the fifth string, and it will still give us a one octave major scale.

One octave major scale pattern
Root note on fifth string

FRETBOARD REVELATIONS

Let's compare the one octave pattern in the first measure of the TAB above to the one octave pattern we learned in Confession #8 Learn the Major Scale.

One octave major scale pattern
Root note on sixth string

One octave major scale pattern
Root note on third string

These two patterns actually look very similar.  The layout of the notes on the:
  • the sixth string is the same as on the third string,
  • the fifth string is the same as on the second string, and
  • the fourth string is the same as on the first string.

The only difference is that when moving up one whole step to switch from the note D to the note E:
  • in the first pattern, we have to back 3 frets,
  • in the second pattern, we have to go back only 2 frets.

This observation provides some insight into standard tuning:

  • On any of strings 6, 5 ,4 or 2, if you move up one string and back 3 frets (i.e. switch from finger 4 to finger 1), that's a whole step.  
  • On string 3, if you move up one string and back 2 frets, that's a whole step. 

The way I like to remember these rules is that:
  • when moving from finger 4 on one string to finger 1 on the next higher string, that's a whole step, and
  • when moving from string 3 to string 2, the whole step is one fret closer than it is on the other strings.

Remembering these rules will allow you to build a major scale anywhere on the fretboard.  Apply the major scale formula from Confession #8 Learn the Major Scale and then use these rules when switching strings.


Last week's confession, Confession #20 - Palm Muting! (Part 1), has been updated to include a video.


Next Week's Confession - Finger 3-4 Independence! (Ex. #2)


Saturday, 27 April 2013

Confession #15 - Find the I, IV, V in any Key!


As we learned last week in Confession #14 - Know What Chords to Play!, the I, IV and V chords in any major key are all major chords.  Major chords have a happy feel to them and thus are very popular chords in all kinds of music.  This makes the major chords very important chords to know.

In this week's confession, we'll learn how to quickly find the I, IV and V chord in any key by using Root 6 and Root 5 barre chords (see Confession #11 - Learn Root 6 Barre Chords! and Confession #12 - Learn Root 5 Barre Chords!).


STARTING ON A ROOT 6 BARRE CHORD

Let's say that you are playing a root 6 barre chord at the 5th fret of your sixth string, like this:


You would be playing a A chord (because the note at the 5th fret of the sixth string is an A).


If you treat the A chord as the I chord (i.e. the song is in the Key of A), then your IV chord will be the root 5 barre chord at the 5th fret of your fifth string, like this:


You would be playing a D chord (because the note at the 5th fret of the fifth string is an D).


And finally, the V chord will be the root 5 barre chord at the 7th fret of your fifth string, like this:


You would be playing an E chord (because the note at the 7th fret of the fifth string is an E)

Thus, in the Key of A, the I, IV and V chords are A, D and E.


You can use this pattern anywhere on the neck:
  • Play a Root 6 barre chord as your I chord.  
  • Play a Root 5 barre chord at the same fret, and that's your IV chord.  
  • Play a Root 5 barre chord two frets higher, and that's your V chord.

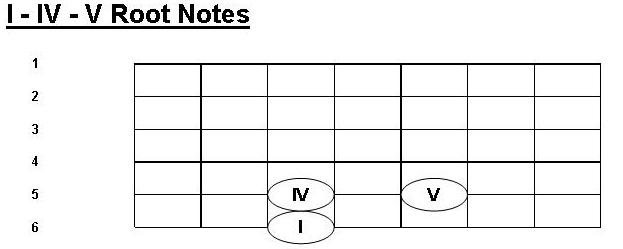
If we focus just on the root notes of the chords, then you can think of it like this:


Note that I haven't given any fret numbers.  That's because this works anywhere on the neck. Pick any note on the sixth string as the root of your I chord.  The roots of the IV and V chord will be on the fifth string where shown above.


STARTING ON A ROOT 5 BARRE CHORD

Let's say that you are playing a root 5 barre chord at the 5th fret of your fifth string, like this:


You would be playing a D chord (because the note at the 5th fret of the fifth string is an D).


If you treat the D chord as the I chord (i.e. the song is in the Key of D), then your IV chord will be the root 6 barre chord at the 3rd fret of your sixth string, like this:


You would be playing a G chord (because the note at the 3rd fret of the sixth string is an G).


And finally, the V chord will be the root 6 barre chord at the 5th fret of your sixth string, like this:


You would be playing an A chord (because the note at the 5th fret of the sixth string is an A).

Thus, in the Key of D, the I, IV and V chords are D, G and A.


You can use this pattern anywhere on the neck:
  • Play a Root 5 barre chord as your I chord.  
  • Play a Root 6 barre chord two frets lower, and that's your IV chord.  
  • Play a Root 6 barre chord two frets higher, and that's your V chord.

If we focus just on the root notes of the chords, then you can think of it like this:


Note that I haven't given any fret numbers.  That's because this works anywhere on the neck. Pick any note on the fifth string as the root of your I chord.  The roots of the IV and V chord will be on the sixth string where shown above.


Next Week's Confession - Finger 3-4 Independence! (Exercise #1)


Saturday, 6 April 2013

Confession #12 - Learn Root 5 Barre Chords!


In Confession #11 - Learn Root 6 Barre Chords! we learned how to play a bunch of different major chords by sliding an E shape chord up the neck, and using our first finger as a barre.  There is another very commonly used barre chord called a Root 5 barre chord, or an A shape barre chord.

WARNING!  Barre chords can be very hard on your fretting hand.  Make sure that you warm-up first (see Confession #6 - Warm-Up!).  If you start to feel any pain or discomfort in your fretting had, stop immediately!  If you keep on playing, you can do serious damage to your fretting hand.


FIRST, THE A CHORD

Let's take a look at a basic open A chord.  Generally, you will use fingers 1,2 and 3 to play the A chord, like this:


But what if you used only finger 3, like this:


Then finger 1 (your index finger) would be free to do other things.

Let's use the 3 only fingering, and then slide it up two frets like this:


As in the the lesson on Root 6 barre chords, if you strum strings 1 thru 5 now, its not going to sound very musical (remember, when playing an A chord, we don't strum the sixth string, so don't do it when you are playing A shape barre chords).  When we slid finger 3 up two frets, we changed the pitch of 3 of the 5 strings by 2 semi-tones (see Confession #8 - Learn the Major Scale! if you are unsure of what a semi-tone is), but the pitch of the other 2 strings was unchanged.

EDIT:  In each of the 3 diagrams above, the second string should not have an "O" beside it. (It's a pain to redo the diagrams.)


TURN AN A CHORD INTO A B CHORD

How do we change the pitch of the other 2 strings by 2 semi-tones as well?  We do this by barring finger 1 across all the strings at the 2nd fret, like this:


Now the pitch of strings 1 and 5 have also been changed by 1 semi-tone.  The resulting chord is an B chord.

By barring finger 1 across all the strings at the 2nd fret, we are using our finger as a moveable nut (the 0th fret is the guitar's nut).

Don't worry if the barre with your third finger prevents the first string from sounding.  As you'll see in the chart below for the C chord, all 3 notes of the chord are included in the notes played on strings two thru five.

TIP:  It takes a fair bit of pressure with finger 1 to properly fret strings 1, 2 and 6.  If you aren't using enough pressure, they either won't sound properly or at all.  Make sure you are barring just behind the fret.  Also, tuck you elbow in at your side.  This will provide some leverage to create the needed pressure.


NOW A C CHORD

We can take this shape and slide it up and down the neck to make different chords.  For example, if you barre the 3rd fret while holding the same shape with finger 3, you'll be making a C chord, like this:


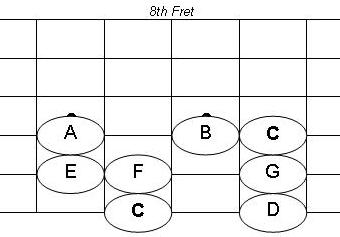
How do you know that this is a C chord?  Here is the C chord chart again, but this time with the names of the notes, instead of the fingerings:


This is a C chord because the note at the 3rd fret of the fifth string is a C.  That's the note that gives the chord its name.


ROOT 5 BARRE CHORD / A SHAPE BARRE CHORD

Because the name of the chord comes from the fifth string, a barre chord based on the shape of an open A chord is called a "root 5 barre chord".  The note on the fifth string is the root note of the chord.

Because it is based on the shape of open A chord, it is also sometimes referred to as an "A shape barre chord".

PUTTING BARRE CHORDS TO WORK

Now that you know how to play a root 5 barre chord, you can play a whole bunch of different chords, just by moving this shape up and down the neck.

This week's video includes an example that is based entirely on root 5 barre chords.  The example is a simple chord progression based on the I, IV and V chords in the key of A (being A, D and E major chords). Note the use of the 'folk rhythm' (see Confession #10 - Learn the Folk Rhythm!) over the IV chord (i.e. the D chord played at the 5th fret).


MORE LEARNING THE FRETBOARD

As you are experimenting with the root 5 barre chord, you will be learning the names of the notes on your fifth string.

Note in the chart for the C chord above, that the note at the 5th fret of the third string was also a G.

So, once you learn where a note is on the 5th string, you now also know where to find that same note on the 3rd string, like this:


As you are learning your root 5 barre chords, you are also learning the names of the notes on the fifth string  and the names of the notes on the 3rd string.


MORE COOL ROCK SOUND

Take another look at the C chord above.  The notes on the bottom 3 strings are C - E - C,  the second C being one octave higher than the first.  From a theory perspective, these notes are the root, the fifth and the octave in the key of C (I'll explain the theory in a future confession).  If you play just these bottom 3 strings, you get that cool rock sound.

Turn up your amp, turn on the overdrive channel, strum the bottom 3 strings, and let them ring!


Next Week's Confession - Learn More Barre Chords!